Sonos as Dedicated MacBook Pro Speaker
It's no secret that I am a huge Sonos fan. I use this system every single day listening to podcasts or music while working, cooking, doing chores, or even using it as the primary speaker for our home theater watching TV.
One area I have always struggled a bit to bring Sonos into is my work. While I have used Sonos to play podcasts and music while I work, this is only via the Sonos app. Generally, this works perfectly for services that are integrated into the Sonos app. However, it doesn't allow for my MacBook's audio to be ported to the speaker. This might include notifications sounds like an email being received, a video playing, or a virtual meeting's audio. This has always been an area Sonos product lineup has been lacking.
I wanted to get the MacBook directly wired into the Sonos ecosystem and with a little inspiration from some folks on Reddit I started taking a deep look into the options. I had some requirements I wanted to meet both technical and non-technical for any speaker I might consider so let's start by taking a look at those.
- Connectivity to M1 Macbook Pro
- Able to output real-time system audio
- Selectable as an audio output source
- Cannot lag, create feedback, or loop audio during virtual meetings/calls
- Can be part grouped with other Sonos speakers
- Fits below my monitor
- Doesn't require a ton of desk space
- Doesn't create a ton of desk clutter
With those requirements in mind, let's take a look at the connectivity options for the Sonos lineup as of December 2022.
AirPlay
On the surface, AirPlay seems like such a good solution and solves many of the problems. It's wireless which is great! No cables or adapters and MacOS has native support for AirPlay. It gives you multi-room audio and you can even join other AirPlay devices like TVs or speakers from other manufacturers in the group. This all sounds awesome and in many scenarios it is. However, there are some caveats.
The first one is constant disconnects. AirPlay cannot remain connected indefinitely to a Sonos speaker so you will find yourself frequently having to go into menus and set your output source back to AirPlay. This will get tiresome pretty quickly. I tried using some software to help with this problem. In particular, AirFoil from Rogue Amoeba Software, Inc. AirFoil would reinitiate the connection automatically which was great, but it created new issues. The speaker's volume would jump wildly on start and startle me every time. AirFoil only allows one Mac application at a time to port its audio to it, so it doesn't solve what I am looking for either. Another nuisance with the app was the constant relaunching of whatever app you had selected to port through AirFoil. Let's say I was porting Apple Music and closed it but AirFoil remained running. AirFoil would almost immediately relaunch the app that I had just closed. Outside of those issues, the app works well, but it didn't solve my needs and I didn't like the issues it introduced.
This seems like a good place to bring up the lag associated with Sonos speakers. By default and quite intentionally Sonos has a built-in delay. This delay is used to do processing and smooth out the experience and issues that might arise when trying to play many speakers in sync. The stock delay is 75ms. This seems quick but it's perceptible and it's made even worse by using AirPlay. Clicking next on an already playing album results in several seconds waits before the next track audibly starts playing despite the screen already showing the new track.
So although AirPlay could solve this use case for many people, for me it wasn't great.
Bluetooth
Supported by the Move and the Roam which are the two portable options from Sonos. I didn't consider Bluetooth seriously for a few reasons. First and foremost is the form factor of the speakers that support it. Neither of these fits below the monitor part of my requirements. Secondly, I have just never been a fan of audio over Bluetooth for a whole host of reasons unless I am using headphones. So although this might work for some, it wasn't for me.
RCA
The Sonos Port has RCA jacks, so getting an RCA to 3.5mm audio converter would be easy and that would make a connection to the Macbook's headphone port. This would work great and would be pretty simple.
The problem I have with this solution outside of its price ($450) is that it's yet another device that needs to sit on or around my desk that isn't the actual speaker. In addition to this device, you still need the speaker that will take the audio source from the Port. Two devices to buy, two devices to power, and two devices that need to take up space on the desk. That wasn't a tradeoff I wanted to make.
Audio In
The Sonos Five is the only speaker in the lineup that provides a native 3.5mm audio in input. This on the surface solves many of the issues. It's a single speaker and has built-in connectivity and although I like the Five it's a pretty large speaker at a height of eight inches tall and fourteen inches wide. Ideally, the speaker is centered below my monitor, and depending on monitor height this speaker may not have enough clearance to sit there. It's also a pretty spendy option running about $550.
HDMI eARC
One of the more popular options for newer speakers is HDMI eARC. This is mostly geared at home theater setups and is included on the newer model soundbars like the Beam and Arc. This HDMI setup doesn't work for a computer-based setup.
HDMI to HDMI eARC Adapter
The fine folks on Reddit pitched another option, which was HDFury Arcana ($300). I admit I am not familiar with this product at all and doesn't look to be readily available for sale in the United States as best I can tell.
The product claims to be able to take any HDMI source audio to any eARC sound system. Given the cost of this device compared to the dock I acquired I think I would prefer the dock and the added ports and other benefits it provides but this is a very interesting alternative potentially.
Optical
Then we get to a good old optical port. Optical is supported by the Arc, Playbar (discontinued), Beam, and Ray all of which are sound bars. So, these are all meant to be center speakers and none of these are particularly tall so that's a good start.
Optical of course isn't a native output from the Mac but we can get support for it with some help. More on that in a bit. The Arc is massive, expensive ($900) and truly built as a high-end home theater speaker so we're going to remove that one. Similarly, PlayBar is large and also discontinued. So that leaves us with Beam and Ray. Both are similarly sized and some of Sonos's newer models. Compared to the Ray ($280), the Beam is a bit more expensive ($550) and slightly larger.
MacBook Optical Setup
At this point, I think we've settled on the Ray for its price point and fit. It sports optical connectivity so next, we need to focus on getting it connected to the MacBook. For this, we need another device as mentioned above. The OWC Thunderbotlt 3 Dock.
This Thunderbolt 3 dock provides numerous ports and amongst them is optical output. This dock as with almost any Thunderbolt 3 dock isn't cheap. It adds another $330 to the project but given I had already been entertaining docks for the simplicity of connecting to the MacBook and the expansion of available ports for this and other uses. This also allowed me to get back to the single USB-C connection to my MacBook to support my monitor, webcam, and now Sonos output.
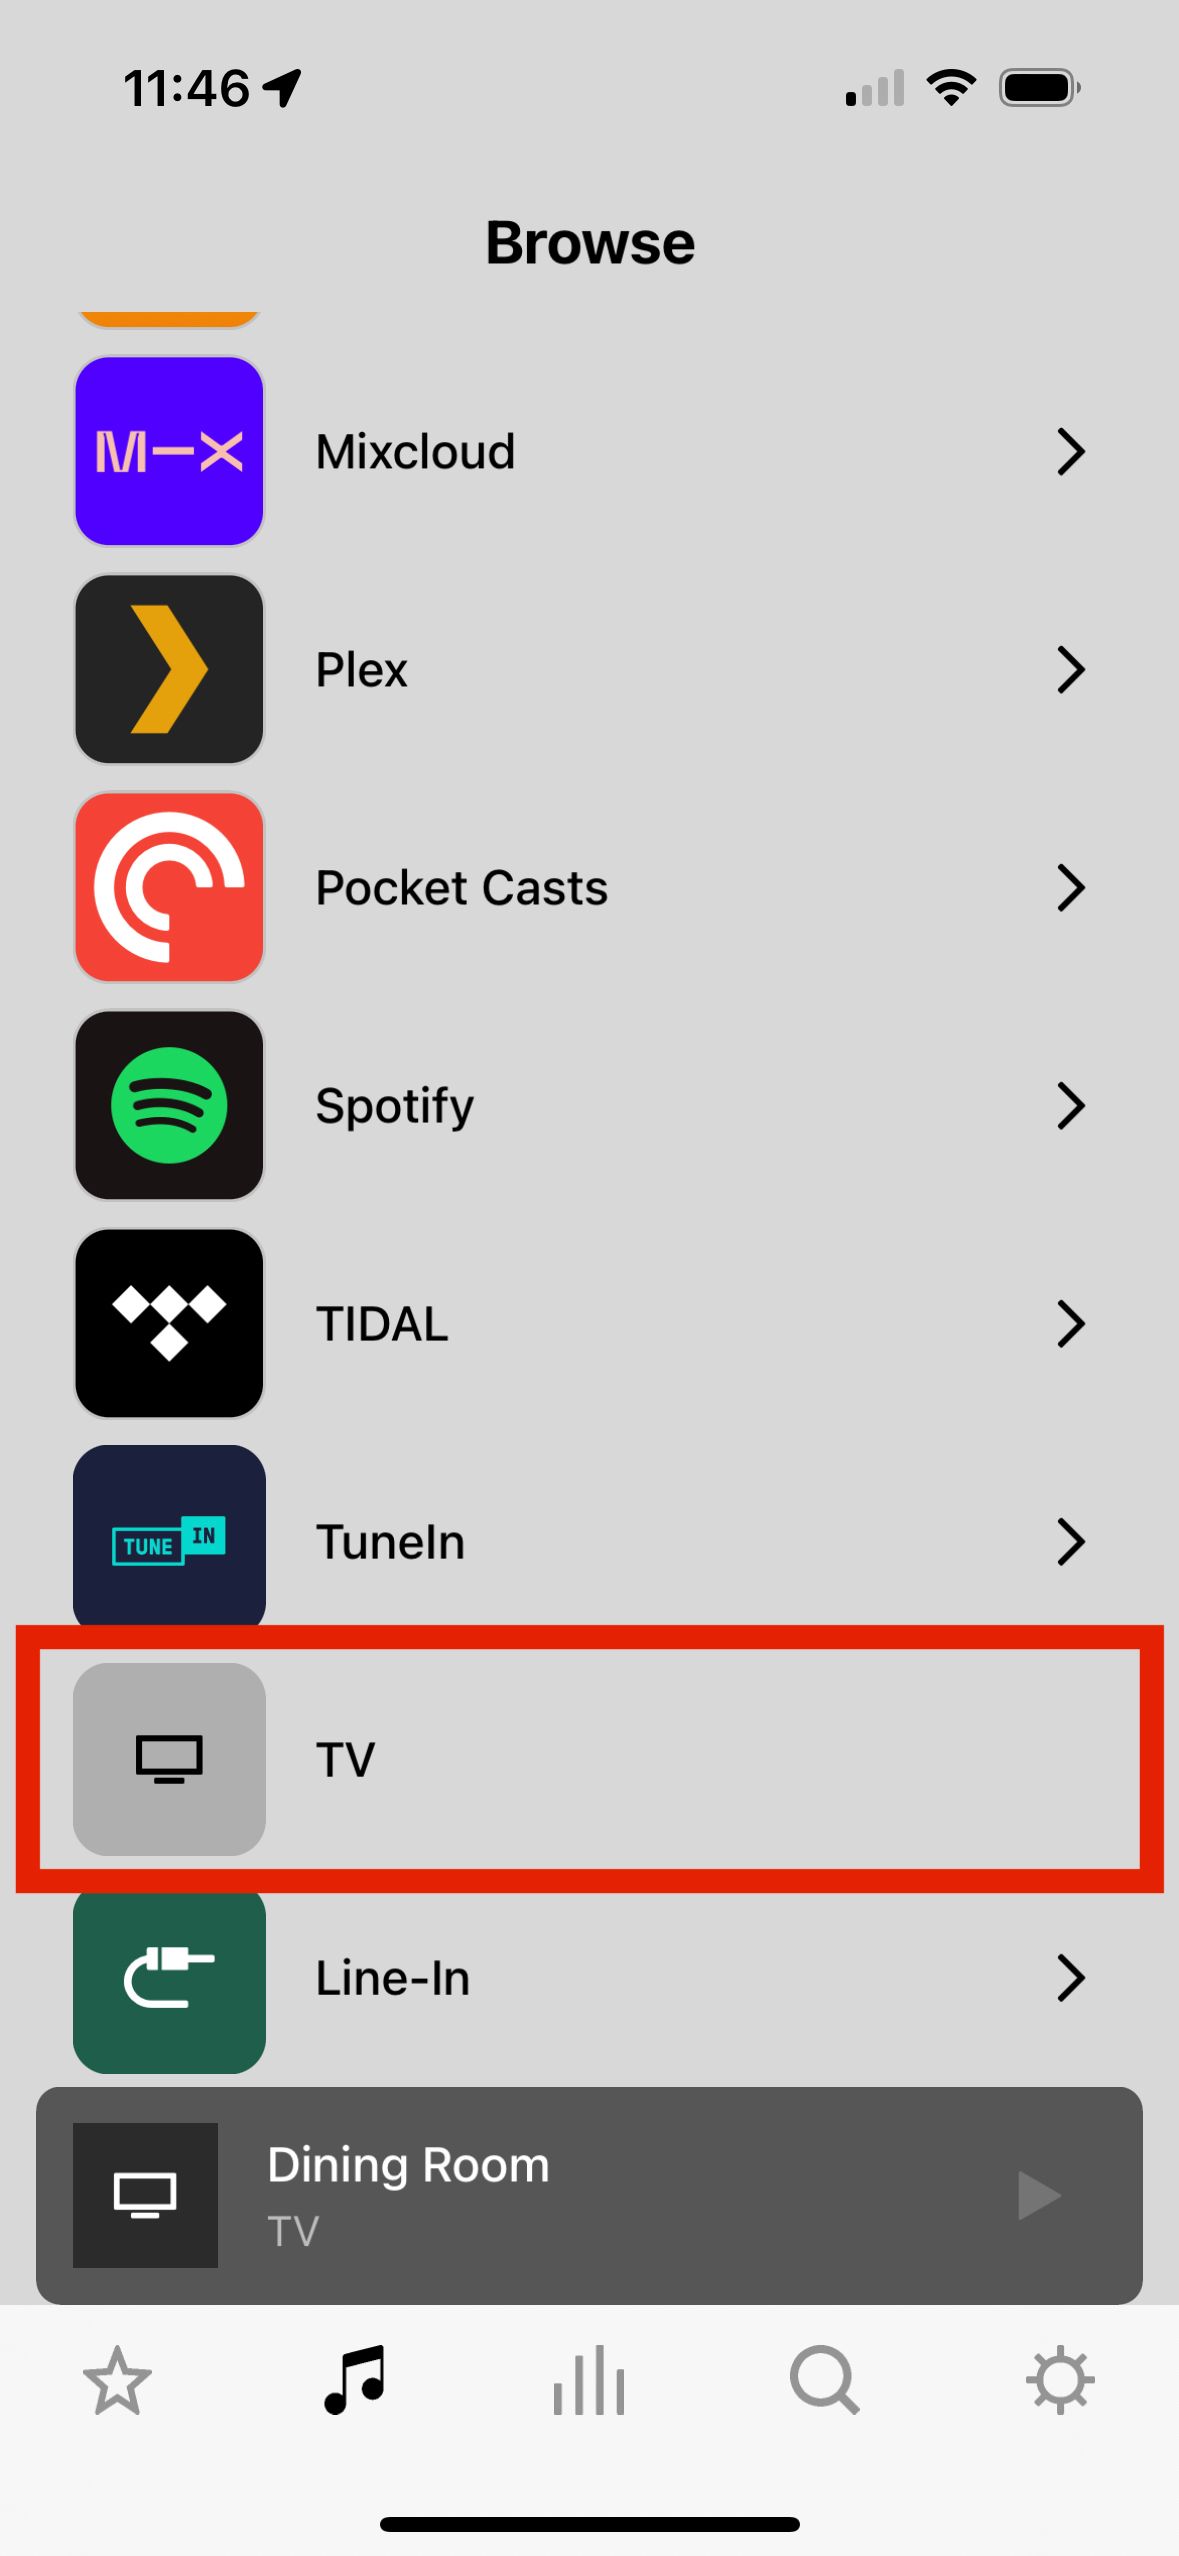
After connecting the optical cable from the dock to the Ray we need to jump on the Sonos mobile app and set the Sonos Ray's Music Source to "TV" (See screenshot below). You may also want to adjust Ray's volume to something like 25%.
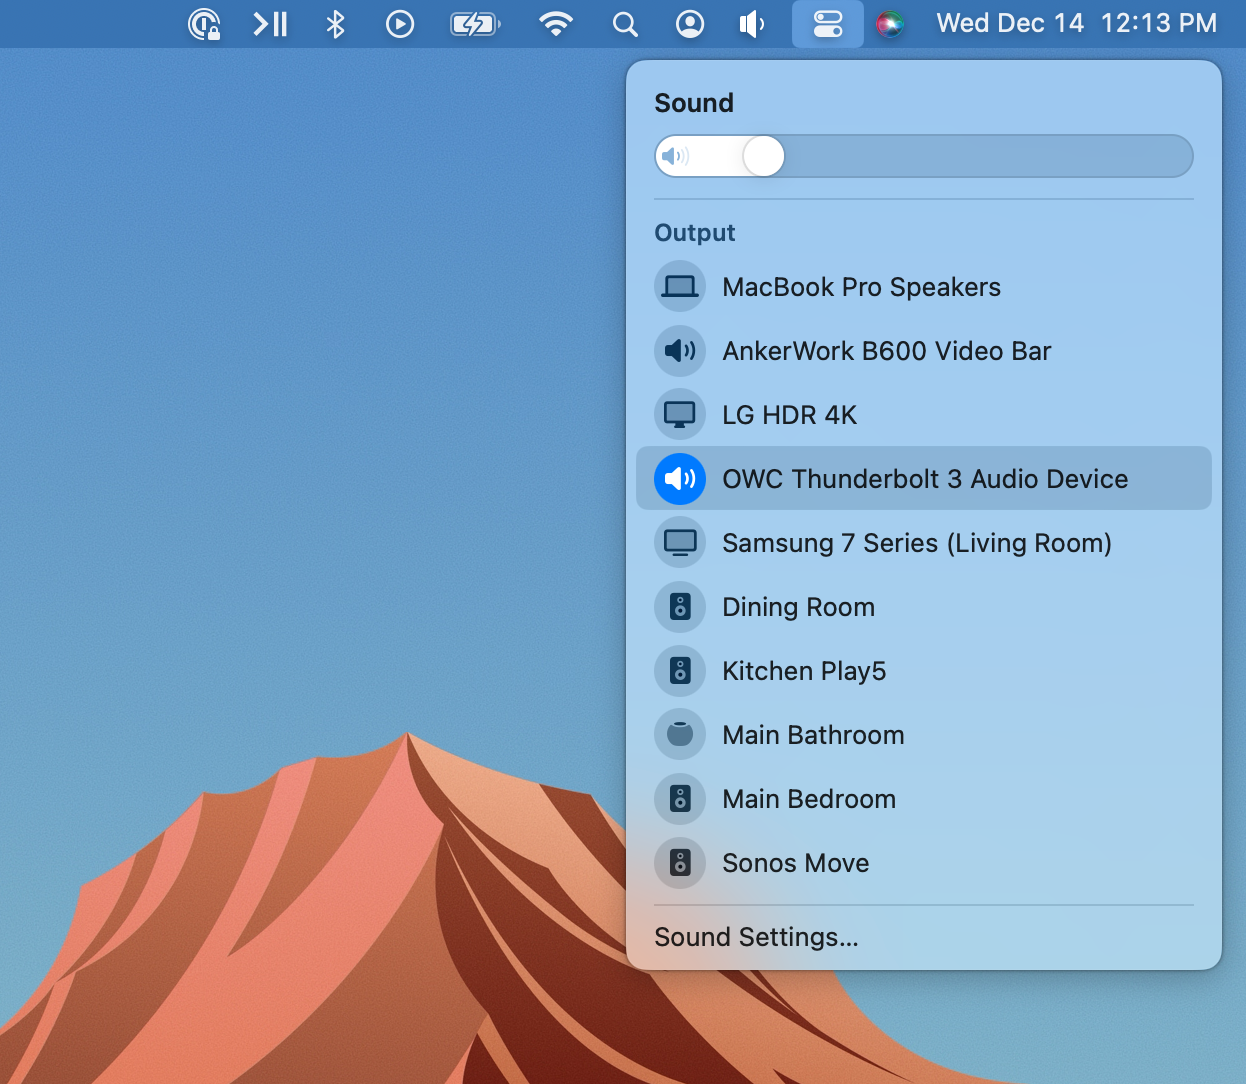
Next, set Mac's output to the OWC Thunderbolt dock. You should now see this as a selectable sound output source (See screenshot above).
At this point, all audio playing on the Mac should be flowing to the Sonos Ray. You may need to adjust the volume of the Ray if you don't hear anything at first. That completes the setup, but there are a few additional things you might run into depending on your use case, so let's look at those.
Audio Sync
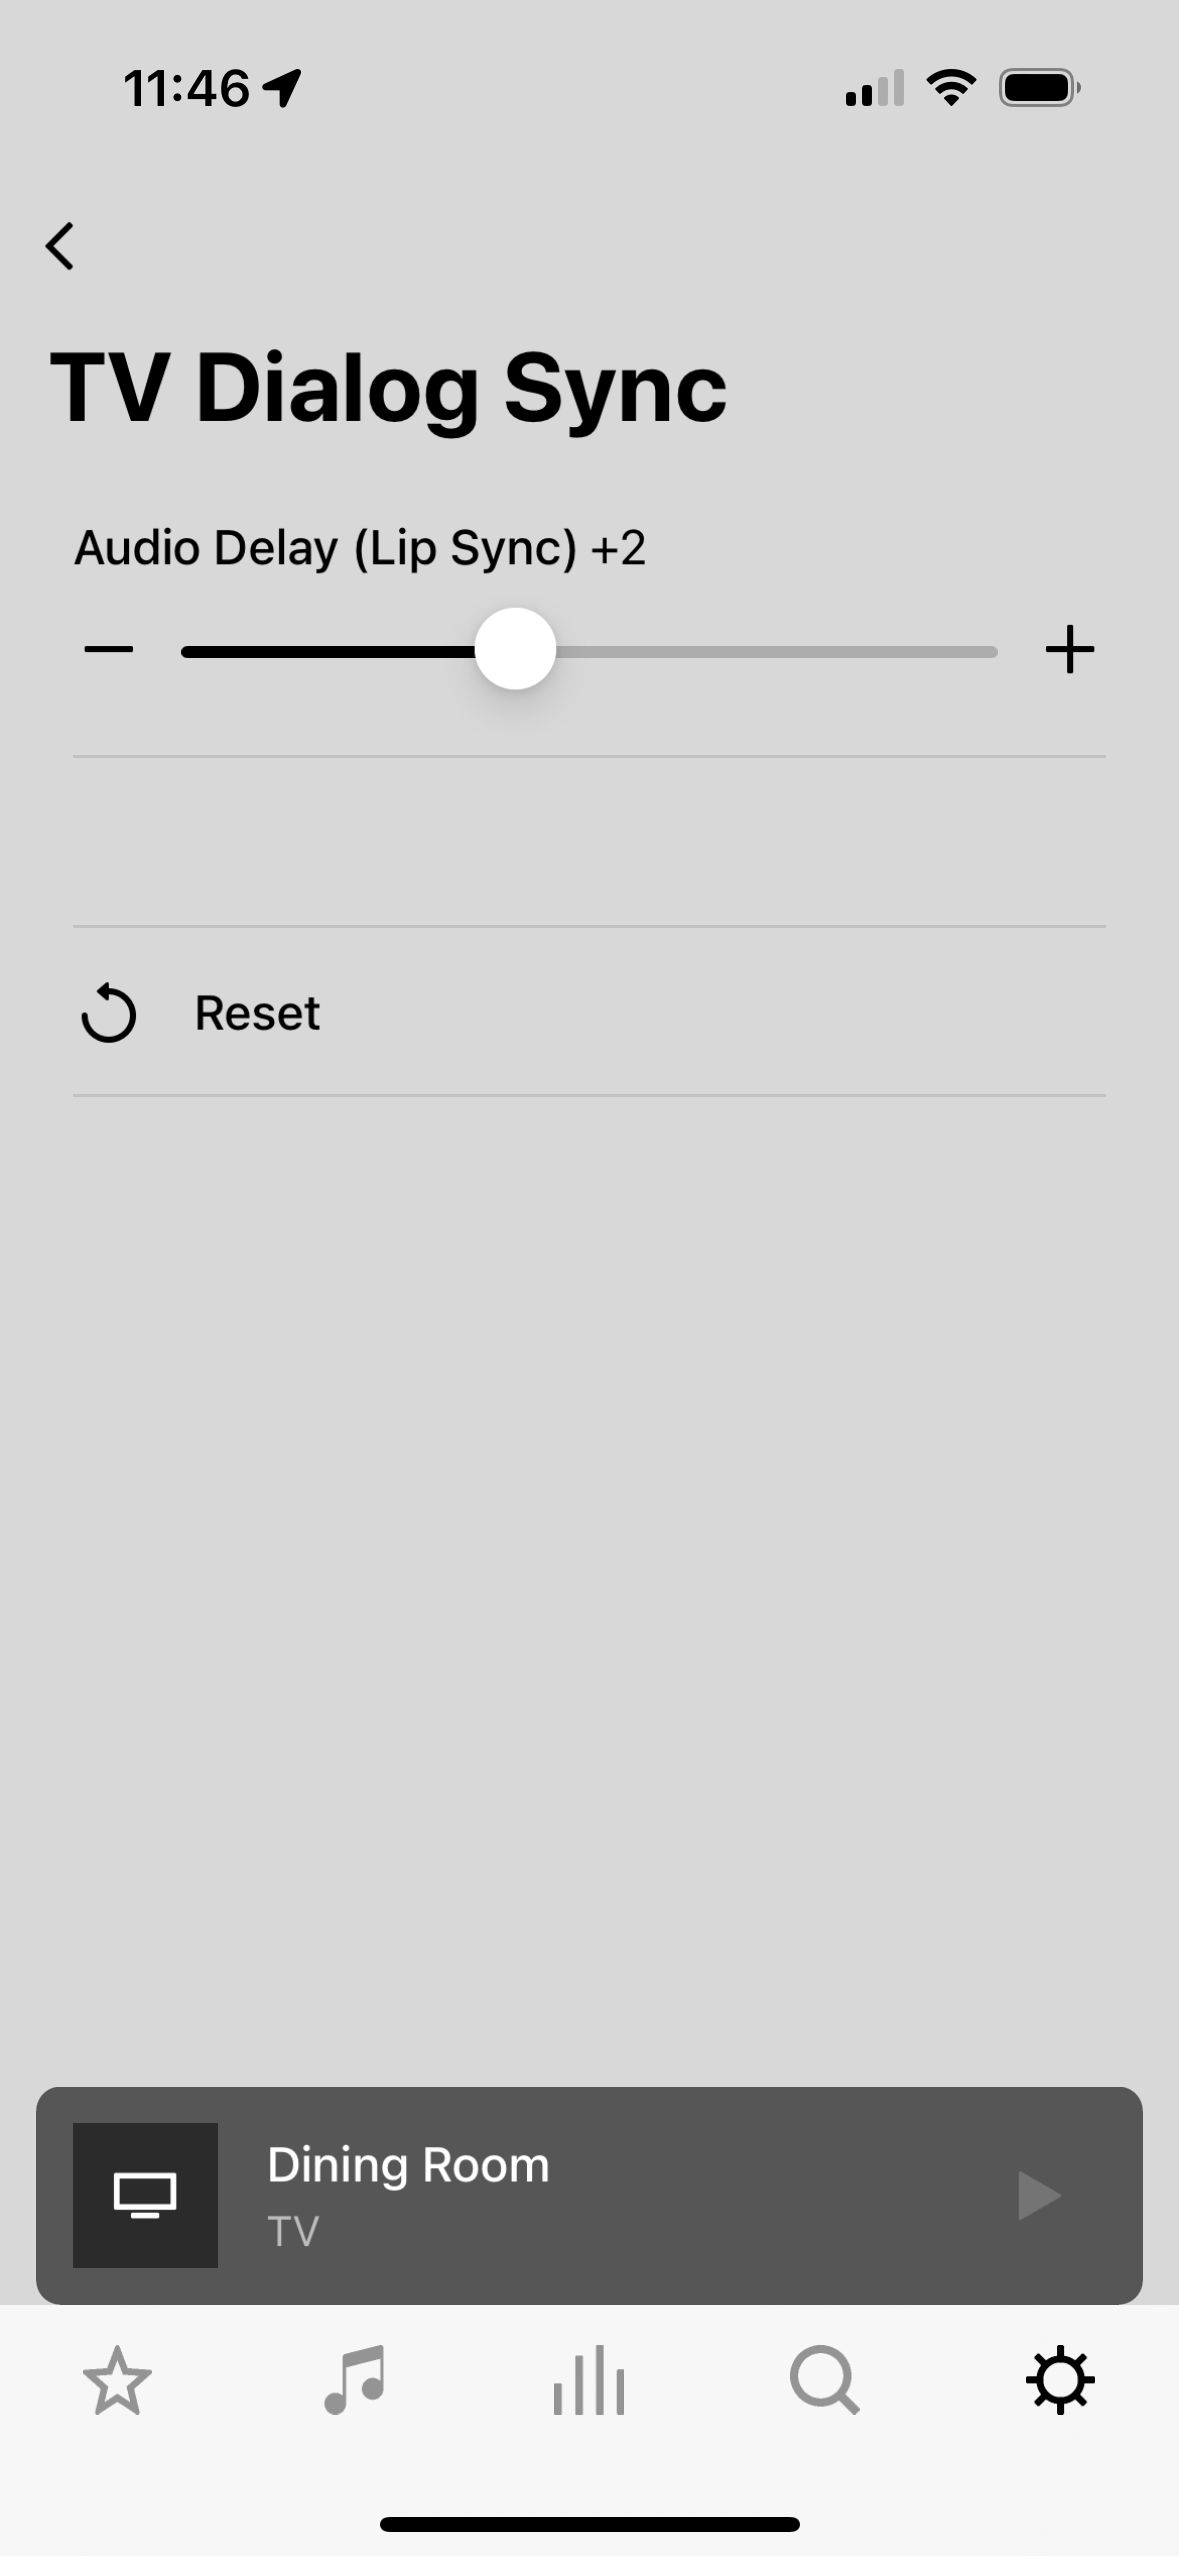
If you use this setup during meetings you will notice that the audio isn't synced up to the video. In the Reddit post I linked to earlier, the original poster mentioned changing the Audio Delay (Lip Sync) setting to +5 for the speaker. In my case, it was +2 (See screenshot above). This setting can be changed by navigating to Settings > System > {Speaker Name} > TV Dialog Sync in the Sonos mobile app.
You'll just need to join a video call and spend a little bit of time adjusting one by one and see what feels natural.
Volume Control
Volume control didn't work quite as I expected. I would have expected changing the system volume would adjust the volume of the Sonos just as it would the output from the MacBook's speakers. This is not the case.
Optical cables provide a fixed 0dB output and it's expected that the connected device would then amplify and control the audio. This wasn't too big of a deal for me as the Ray has volume controls on top of it and it's at arm's length of me on my desk.
Alternatively, there is a software I have had for years called Menu Bar Controller for Sonos that provides global keyboard shortcuts to adjust the volume of a selected speaker or group of speakers from your Sonos system. The software is only $3.00 so it's a no-brainer add-on for keyboard-based volume control.
Autoplay
Lastly, there are two more quality-of-life settings to enable. The first is "TV Autoplay" (See screenshot above). This will switch the speaker's source to the TV (which is effectively the Mac) automatically whenever sound is detected. So if you had been playing music the day before from some other service or source and left it in that state this will bring it back to the computer setup upon the first received sound.
The other setting is optional depending on your setup. "Ungroup on Autoplay". This will remove the speaker from any other speakers it was grouped and playing with previously. For me, this is a great one as I often group the whole house and listen to music while doing chores. So this setting prevents accidentally playing something house wide in the morning before I have had my coffee.
Both of these settings can be found in the Sonos mobile app. Settings > System > {Speaker Name}.
Optical Adapters
Several folks on Reddit asked why I didn't use optical adapters. I hadn't considered any adapters of this type mainly because I wasn't aware they were available. It looks like possibly this could have saved me a lot of money by not needing the dock. That said, now that I have the dock I am really happy with its added convenience but your mileage may vary.
One recommendation was a 3.5mm to toslink adapter ($9) which is a headphone jack to optical adapter. Another user shared that support for this adpater was ended by Apple in 2016.
Another interesting option is the USB-C to toslink adapter ($20). I am tempted to pick up one of these just to see how well it works. If I do that I will update again with the results.
Wrap Up
So the completed setup we have the Sonos Ray at $280. We added the OWC Thunderbolt 3 Dock at $330 and an optional bit of software for keyboard volume control "Menu Bar Controller for Sonos" at $3 for a project total of $613.
This setup seems to be working exactly as I would expect and I am enjoying the increased audio quality and being able to use desktop applications to control the audio playing from Sonos while still getting all other sounds from the Mac.
It's not a cheap solution but for something I use every single day, I think it was well worth it.
Update: Dec 16th, 2022 - Added Bluetooth, optical, and HDMI adapters based on feedback from Reddit.
Update: Jan 23rd, 2023 - Spelling and grammar.
Update: May 15th, 2023 - Added disclaimer to new article at the top


Member discussion